Trap Continues Throwing Targets
This troubleshooting page will help you find out why a trap continues to throw targets, even if the release button is not being pressed. This issue is commonly known as “Windmilling”. While troubleshooting this issue, keep targets in the machine, do not dry fire the machine.
When working on or around trap machines, always wear eye protection and proceed with extreme caution. Trap machines have pinch points and components that move rapidly. Safety information included in your owner’s manual must be read and understood before performing work on any trap machine.
Step 1:
The first step is to determine if the issue is in the release system or in the trap machine. Disconnect the release cord or wireless receiver from the twist lock plug coming from the control box. Turn the machine on by pushing the rocker or toggle switch to the “ON” position. If the problem persists, the issue is in the machine, skip to Step 3. If the problem has stopped, the problem is in the release system, proceed to Step 2.
Step 2:
When a trap release system, either wired or wireless, causes a trap to keep firing, it is typically due to a short. Shorts can be caused in a few different ways, it is important to thoroughly inspect the release system to find the short. First, inspect the cable between the plug and the button or receiver. Look for any damage to the cable, including rodent chew marks, shot embedded in the cable, or cuts. Next, inspect the plug that mates to the trap, disassemble the plug, and inspect the connection between the individual wires and the plug. Excessive corrosion or damage to the wires at this point within the plug could cause a short. Next, if it is a manual push-button release, inspect the button and the connections to it, a corroded button could be stuck in the closed position, which would cause the trap to continue firing. If you have a multimeter available, it may be helpful to test continuity across a few different points in order to find the short. For the machine to fire, the outer two spades (wire #1 and #2 from the control box) on the twist lock plug must be closed. These wires should not show continuity unless the release cord button is pressed or the wireless system is receiving a signal to fire the machine. If no problem was found with the release system, please contact Lincoln Traps or the manufacturer of your release system for further assistance.
Step 3:
The movement of the throwing arm is determined by a reed switch and magnet. The position of these components is set from the factory, but reed switches degrade over time and may need to be replaced. Before replacing the reed switch, ensure that both the reed switch and magnet are adjusted correctly. Either of these components being improperly adjusted can result in a trap that continues throwing targets. Figure 1 below shows how the magnet should be mounted on the main link. The magnet mounts to a small aluminum bracket, the aluminum bracket is then mounted to the main link (Note: Main link will look different on Rabbit/Chandelle and AR90mm traps). Ensure that the magnet is mounted to the aluminum bracket, such that it is slid all the way to the extent of the slots in the magnet. Additionally, the aluminum bracket must also be slid to the extent of the slots. Use Figure 1 as a reference when checking the orientation of the magnet or magnet bracket. Similarly, ensure that the reed switch is correctly mounted to the reed switch bracket. The reed switch should be slid to the extent of the mounting slots as shown in Figure 2. Disarm the trap and disconnect the power before making any of these adjustments. If the reed switch and magnet are located in the proper position on thier brackets and the problem persists, proceed to Step 4.

Figure 1: Magnet Location
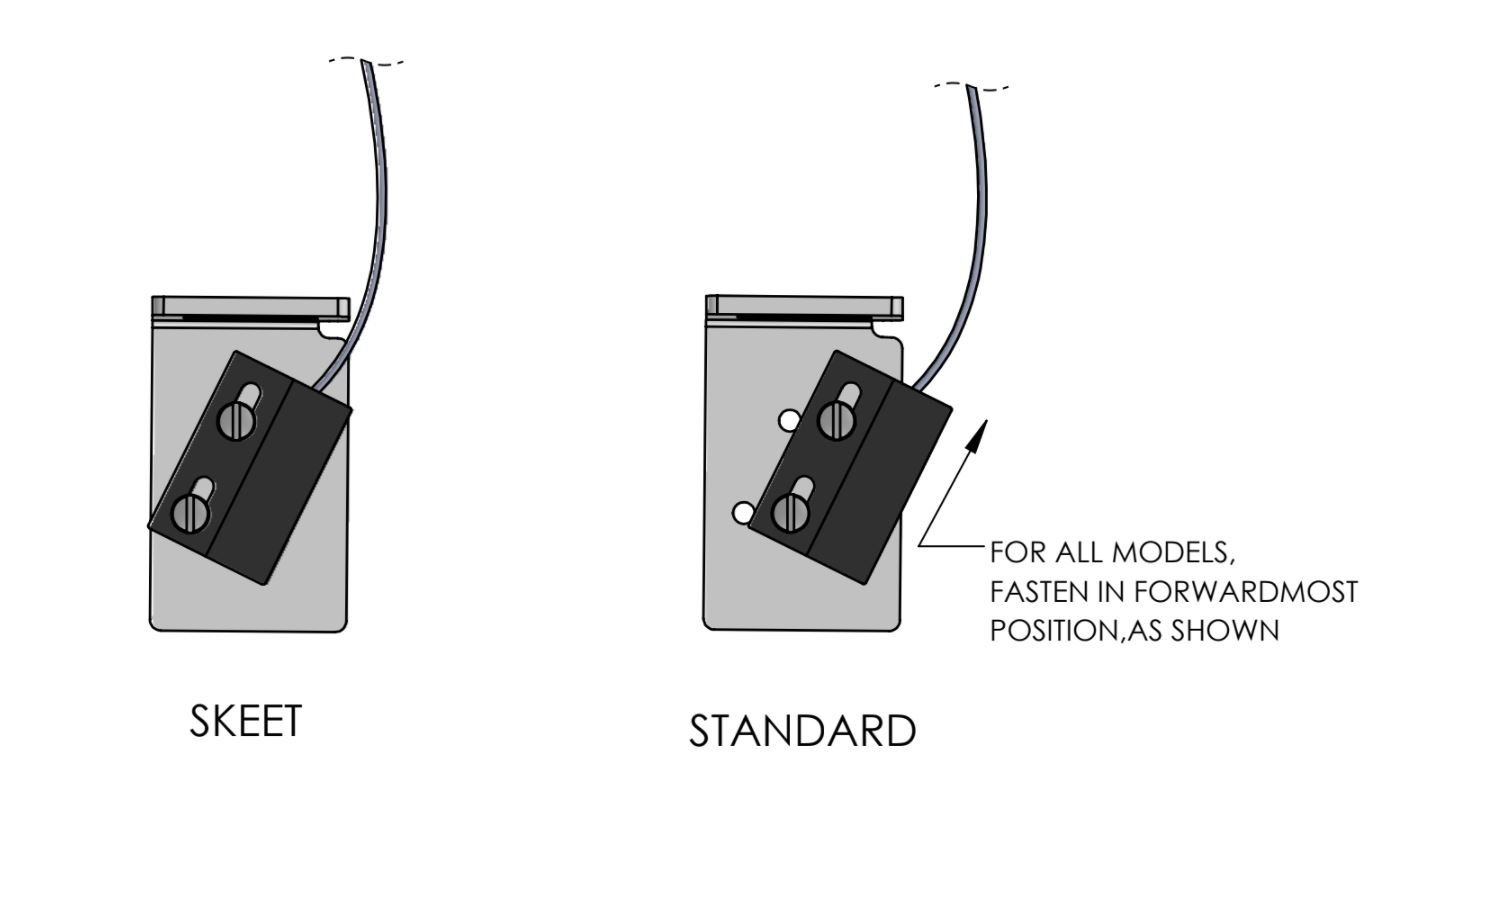
Figure 2: Reed Switch Location on Reed Switch Bracket
Step 4:
A trap can continue throwing targets if the reed switch bracket has been improperly adjusted on the frame of the machine or if the switch is failing. If the reed switch bracket is located too far toward the front of the machine, the arm will not stop in the cocked position. The position of the reed switch bracket should roughly match what is shown in Figure 3. As a reed switch degrades, the response time gets longer and may cause the arm to repeatedly travel past the cocked position. The reed switch may be adjusted to resolve this, but the switch should be replaced soon as it will eventually fail completely.
Disarm the machine and disconnect the power before making adjustments. To stop the arm earlier and prevent over traveling, move the reed switch bracket toward the rear of the trap by loosening the 3/16” Allen head bolt that holds the reed switch bracket to the frame of the machine and sliding the bracket back. Retighten the Allen head bolt, make sure the reed switch and magnet are parallel to each other. Turn the machine “ON” to test if this adjustment has solved the problem. If the throwing arm now stops in the cocked position, adjust the reed switch to the proper location by following the instructions in step 8 here.
If the problem persists or is happening intermittently, the reed switch should be replaced. Click here for further instructions on installing and adjusting a new reed switch.
If the problem is still occurring after adjusting the reed switch bracket and/or replacing the reed switch, continue to Step 5.

Figure 3: Reed Switch Bracket Location (Location is slightly different on Rabbit/Chandelle and AR90mm traps, but the troubleshooting procedure is the same)
Step 5:
If replacing the reed switch has not solved the problem, replace the relay. Click here for further details on replacing the relay. If the problem still persists after replacing the relay, go to Step 6.
Step 6:
The issue may be caused by a short in the release cable pigtail that connects the release system to the circuit board. Follow steps 1, 2, and 4 (skip step 3) of the Release Cable Replacement guide to disconnect the release cable from the circuit board. With it disconnected, turn the machine back on and check if the machine is still continuously firing. If the machine is no longer windmilling, the issue is in this cable that connects the release system to the circuit board. Either replace the whole cable by following the Release Cable Replacement guide or inspect the cable assembly for the short and repair. If this did not solve the issue and the machine is powered by a transformer, proceed to Step 6. Otherwise, please call our office at 717-274-8676 so a member of the tech support team can assist you.
Step 7:
If the machine is powered by a transformer and the problem still persists, the transformer may have failed and is supplying a higher voltage to the machine. The higher voltage results in the motor running faster than normal and being unable to consistently stop in the cocked position. If this is the problem, the machine will run noticeably faster. Use a multimeter to measure the voltage of the transformer under load, if the voltage under load is more than 13.5 VDC, there is an issue with the transformer and it will need to be replaced.